Preparation for Tagging and
sending your Data to TAGGER.biz
Why and when do I need to install this script?
If you only want a collection of JPEG files tagged: then you don’t need this script, go on!
If you want your RAW photos tagged with TAGGER.biz: you need this script, it’ll help you a lot.
Why? Because you’ll only send a collection of small images PLUS a description where to find the RAW files: this will do the trick: there is only a small amount of data to send to TAGGER.biz, because TAGGER.biz will produce loadfiles (for the EXIFTOOL) to do the actual tagging/keywording on your PC locally: the amount of data will really be small, because there is no RAW data involved in the process of “sending and receiving”. To complicated? We’re glad to answer your questions: support@tagger.biz
______________________WINDOWS____________________
Download Runtime “taggerBizControlCentre” for Windows
UNDER CONSTRUCTION! new version to be released until March 31th 2021
The installation procedure will be simplified
In the video below you’ll find instructions how to install the software. In all installations Windows will ask you to confirm that you want to install “taggerBizControlCentre”. In most installations your Antivirus Software will ask you the same: Norton Antivirus will even put the software in quarantaine. In the video you’ll find out how to cope with these installation problems. If you have any questions: don’t hesitate to contact us on support@tagger.biz
_____________________MAC______________________
Download Runtime “taggerBizControlCentre” for Mac/MacOS
1. unpack the zip file below to your favourite folder
2. right click on tagger.biz and choose “open”: you’ll get a warning: go on
3. right click on taggerbizControlCenter and choose “open”: you’ll get a warning: go on
4. copy the files “taggerbizexportconfig.txt” and “taggerbizruntimeconfig.txt” to your $USER directory (to find out: open a terminal and type: echo $USER
4. you can start working by clicking on taggerbizControlCentre
UNDER CONSTRUCTION! Installation video will be created until March 31th 2021
Installation details
Windows script (download details above):
- in Lightroom: save your metadata of the selected files
- Go to directory ../windows/runTaggerBiz
- start runTAGGERbizWindowsGui
Mac script (download details above)
PREPARATION
- Go to directory ../Automator
copy directory taggerBizControlCentre.app to your “Automator” directory (probably on iCloud) - goto /Automator and copy the package taggerBizControlCentre.app to your Automator directory and make the necessary changes in “Run Shell Script” (directory and username):
cd /Users/$USER/OneDrive/python/scripts/MAC/taggerbizControlCentre
./taggerbizControlCentre
RUN Mac script in Automator: taggerbizControlCentre
FOR WINDOWS AND MAC
- In Lightroom: save your metadata of the selected files
- start taggerBizControlCenter
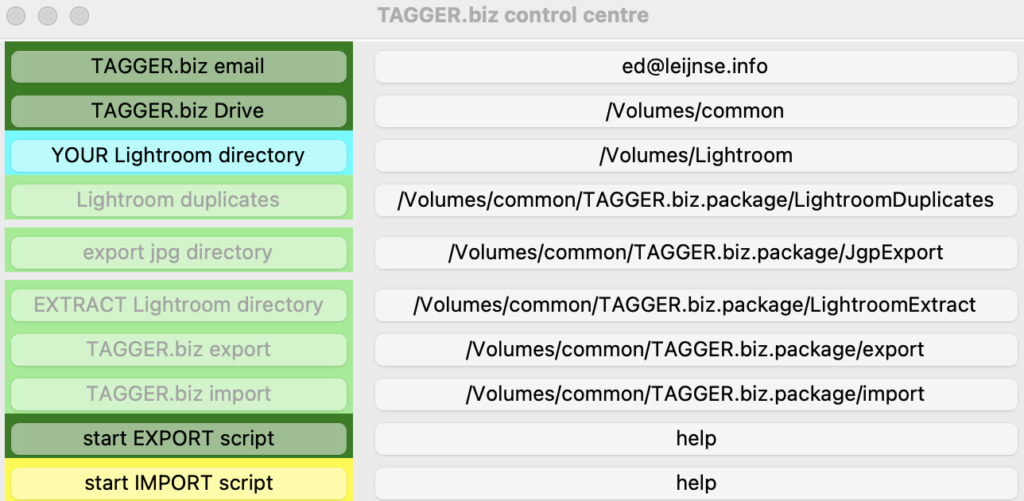
- Sample GUI (Windows)
- If you click on the right side you’ll get information (help)
- click on TAGGER.biz email
- click on TAGGER.biz Drive
all necessary folders will be created - click on YOUR Lightroom directory
- start Export script
- As soon as “start EXPORT script” is ready your package is prepared in “TAGGER.biz export”

Your data are in the TAGGER.biz.package/export directory completed with your email name:
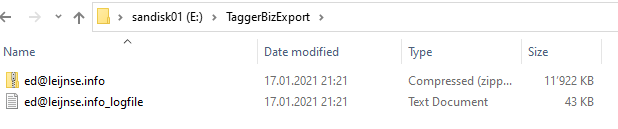
You can now upload your data to TAGGER.biz:
Upload your files to TAGGER.BIZ
How to send your archives and get them back again
- you upload your archive and the logfile to TAGGER.biz
- you send your order (package) as an email to support@tagger.biz
In “subject” please write your order (“basic”, “premium” or “business”) - Your archive will be processed by TAGGER.biz
RECEIVE - Precondition:
Install EXIFTOOL on your PC, Mac or Linux system
Why? because as a result from the tagging process you’ll get exif loadfiles from TAGGER.biz and you have to run them yourself on your system - After processing you’ll get an email notification from support@tagger.biz
- You’ll get some sample images and payment instructions
- After payment you’ll get the EXIF loadfiles for Windows and MAC/Linux
- You’ll get an instruction manual how to handle the EXIF loadfiles and how to refresh your metadata in Lightroom, here is a quick reference:
- Put the EXIF loadfiles in the directory /TAGGER.biz.package/import
- run the EXIF loadfiles (in the directory) by doubleclick or in a shell (CMD / terminal)
- After running the EXIF loadfiles your images will have keywords in directory “Extract Lightroom directory”
- Start the GUI and click on “Start import script”: the directory “Extract Lightroom directory” will be copied in your original Lightroom directory
- After the import is ready: in Lightroom: read Metadata, otherwise the fresh keywords won’t be visible
If you have any questions, please contact us: support@tagger.biz